Window and Door Weather Stripping Installation
Window and door weather stripping installation succeeds when the seal fits the frame correctly and is applied to a properly prepared surface. A stable seal fit supports consistent contact along the door frame and window frame without creating pressure points. This outcome depends on controlled placement, surface preparation, adhesive contact quality, foam compression behavior, gap conditions, and final checking for air leak paths.
Weather stripping installation refers to the process of fitting a seal strip along the contact path where a door frame or window frame meets a closing surface. The seal is positioned to reduce uncontrolled airflow by maintaining continuous adhesive contact or compression against the frame edge. This process focuses only on installation conditions rather than product selection or replacement decisions. The effectiveness of the installation depends on how accurately the strip follows the frame geometry and contact line.
Gaps, peeling edges, hard closure, and remaining air leaks can occur when seal fit, surface condition, or compression behavior is not aligned with the frame requirements. Adhesive contact may weaken if dust, moisture, or residue interferes with bonding on the frame surface. Foam compression that is too tight or too loose can also affect closure resistance and allow air movement along weak points. These outcomes vary depending on installation accuracy and local frame conditions rather than a single fixed factor.
Before installation begins, the condition of the door frame and window frame should be assessed to confirm whether the surface is stable and ready for adhesive or compression-based application. Gap size, surface preparation level, and expected foam compression behavior influence how the seal strip will perform once applied. At this stage, fit and surface condition become the primary focus before moving toward placement and final checking steps.
Installation Scope, Tools, and Seal Fit Before Starting
Window and door weather stripping installation should only begin when seal fit, tools, and frame readiness are confirmed. Installation scope depends on whether the strip can match the frame location and gap width without forcing compression or disrupting closure. This keeps the process limited to fit and readiness rather than adjustments during application.
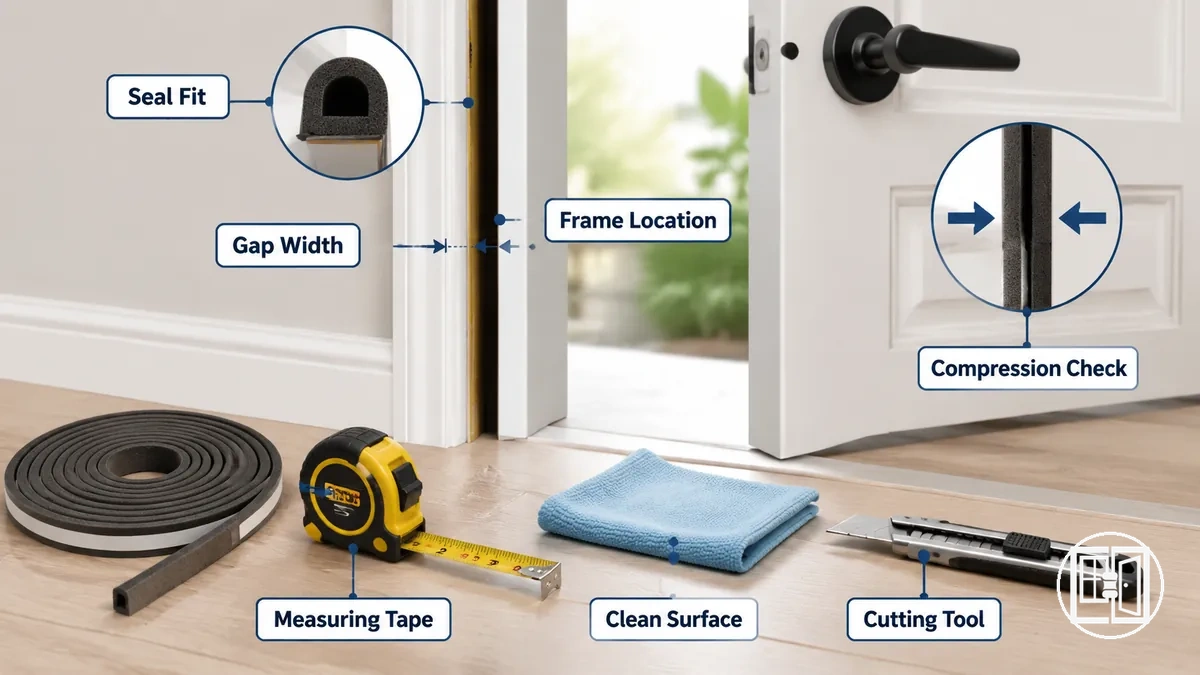
Installation scope defines what must be checked before applying an adhesive strip or foam tape to a door or window frame. It includes confirming frame location, measuring gap width, and verifying that the seal can follow the full contact path without interruption. This separates installation from product selection and keeps attention on application readiness only.
Poor seal fit or missing tools can lead to peeling adhesive contact, uneven compression, or restricted closure along the frame location. If gap width and strip thickness do not align, the seal may either over-compress or leave air leak paths along the seal line. In such cases, reassessing through choosing correct seal becomes necessary before continuing installation.
Before starting window and door weather stripping installation, confirm readiness conditions that affect seal performance and application stability.
- Seal fit matches measured gap width without forcing compression
- Frame location is clearly identified along the full contact path
- Gap width is consistent enough for continuous sealing
- Surface condition is clean and prepared for adhesive strip bonding
- Cutting tool is suitable for clean trimming of seal strip or foam tape
- Cleaning material is available to remove dust and residue
- Measuring method is ready for accurate frame length marking
- Compression behavior allows normal closure without resistance
Preparing Door and Window Surfaces for Weather Stripping
Adhesive and foam weather stripping need a clean, dry, and stable surface on the door frame and window frame to create reliable adhesive contact. Surface preparation removes dust, grease, moisture, and old adhesive that can weaken bonding over time. Without proper drying time after cleaning, foam weather stripping may not sit evenly and adhesive contact can weaken.
A frame may look clean while still holding fine dust, hidden moisture, or residue from old adhesive. These conditions on the door frame or window frame are not always visible but still interfere with adhesive contact. As a result, foam weather stripping may lift early or fail to align evenly along the contact area, increasing the risk of weak sealing.
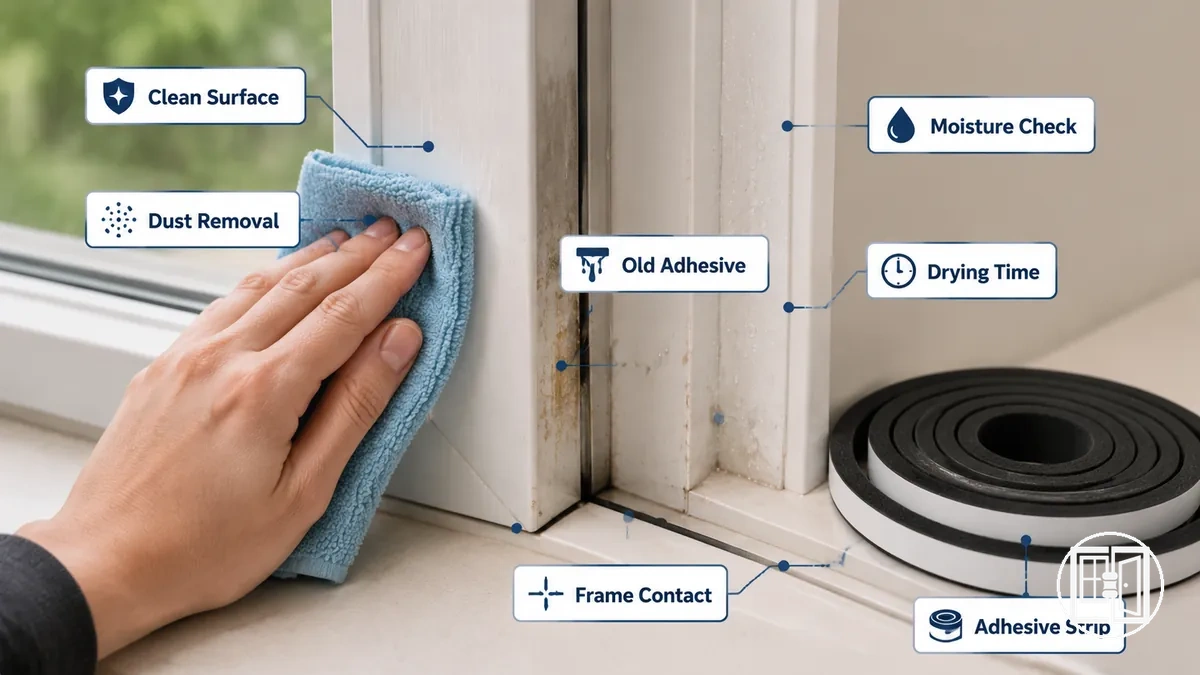
Effective surface preparation ensures the door frame and window frame provide a stable, dry, and residue-free base for adhesive contact before foam weather stripping is applied. This reduces the likelihood of uneven bonding and supports consistent contact along the frame surface. The next step focuses on detailed cleaning checks before application.
Surface preparation should ensure all conditions are met before foam weather stripping is applied to the frame surface.
- Dust removed from door frame and window frame to support clean adhesive contact
- Grease cleaned from frame surface to prevent bonding failure of adhesive strip
- Moisture fully dried to maintain stable foam weather stripping performance
- Old adhesive and residue removed to ensure even contact area
- Drying time completed after cleaning before application begins
- Paint and frame condition checked for stable surface contact
Removing Dust, Moisture, and Old Adhesive
Dust, moisture, and old adhesive must be removed from the frame surface before pressing foam weather stripping into place. These residues reduce adhesive contact and can prevent the strip from bonding evenly across the dry surface, increasing the risk of weak adhesion.
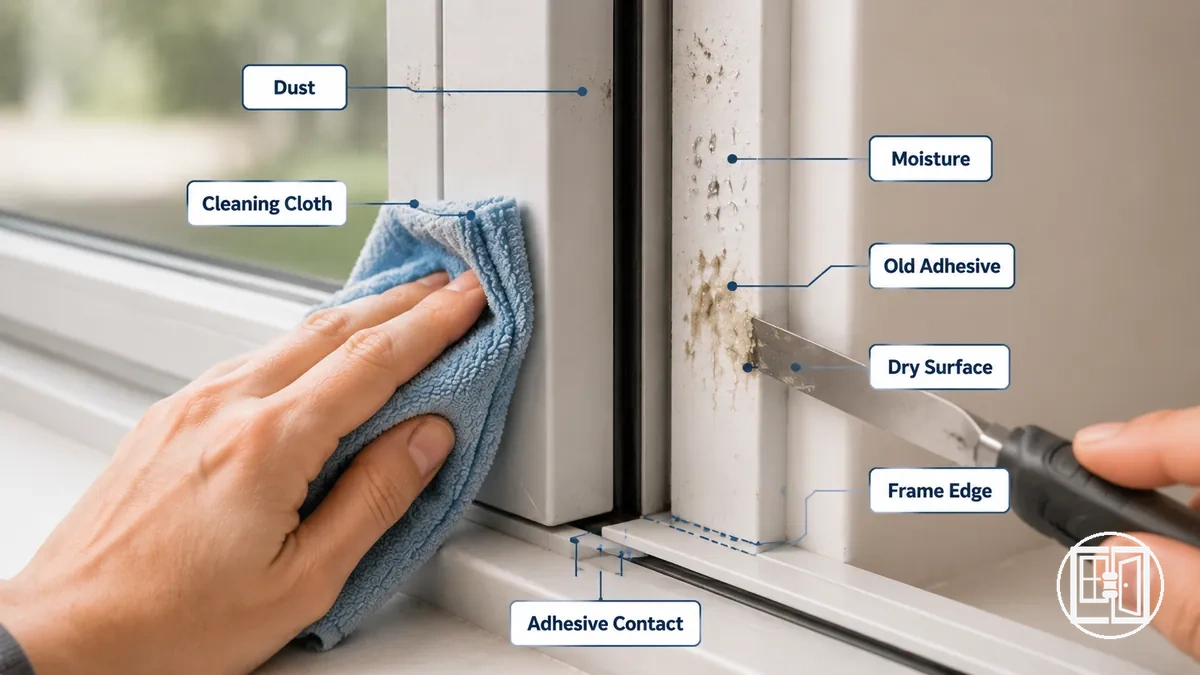
Even when the frame surface looks clean, dust can remain in corners, moisture can sit in small gaps, and old adhesive can stay as thin residue along the contact area. A cleaning cloth should be used to clear dust, while old tape glue should be removed carefully to avoid damaging the frame surface. After cleaning, the area should be left to dry so adhesive contact can form on a stable dry surface.
- Dust: remove using a cleaning cloth to clear loose particles from the frame surface
- Moisture: allow sufficient drying time until a dry surface is confirmed before application
- Old adhesive: remove remaining residue to restore a clear adhesive contact path
Checking Surface Condition and Installation Temperature
Surface condition and installation temperature should meet dry, stable, and product-safe installation requirements before weather stripping is applied. The frame surface needs to be dry, stable paint must remain intact, and the flat contact area must support consistent adhesion and compression. These conditions influence how the strip bonds and performs, depending on product-specific curing conditions.
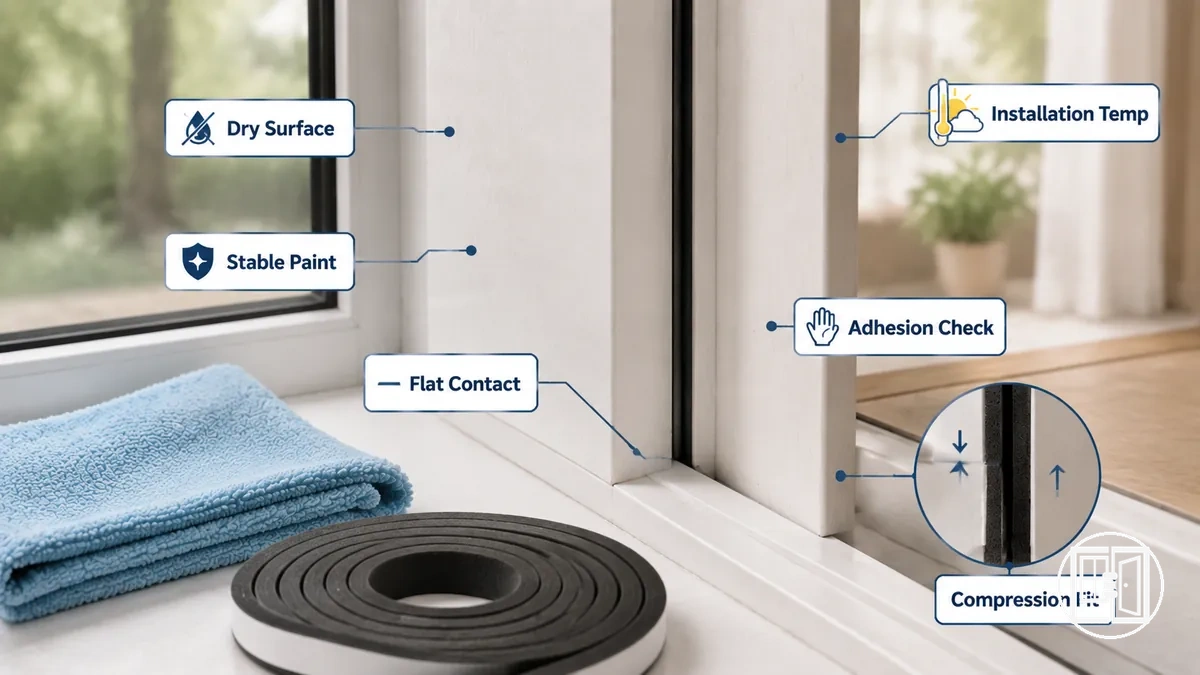
Stable paint, flat contact area, and moderate installation temperature affect how adhesive contact forms and how compression behaves during application. If paint is unstable or the surface is uneven, bonding may weaken and sealing performance can vary during use. Temperature conditions can also influence product-safe curing, so exact thresholds should be checked in the relevant product instructions rather than assumed as universal rules.
Before applying weather stripping, confirm the following readiness conditions to ensure the frame surface is suitable for installation:
- Dry surface: no visible moisture that could weaken adhesion
- Stable paint: no flaking or loose coating on the frame surface
- Flat contact area: even surface to support consistent compression
- Installation temperature: within product-safe application range
- Adhesion readiness: surface supports initial bonding without contamination
- Compression stability: strip can seat without distortion or lift risk
Measuring and Cutting Weather Stripping to Fit the Frame
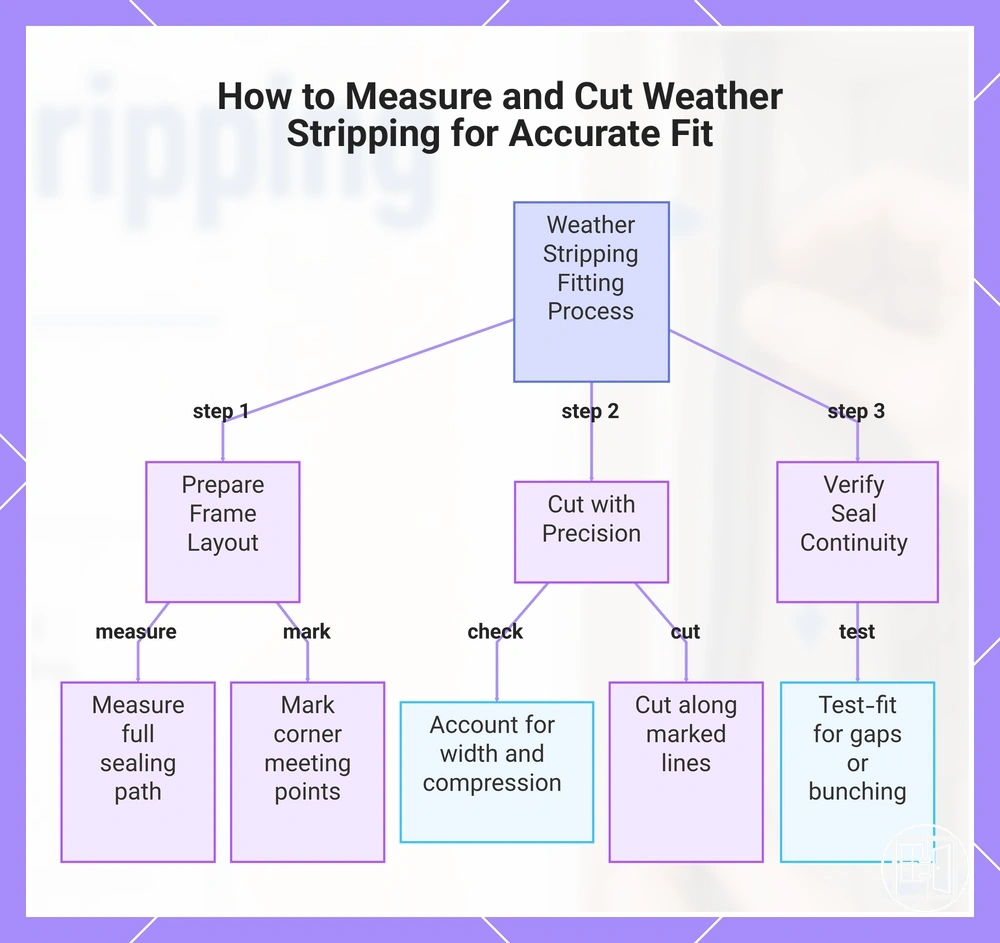
Measuring should follow the sealing path along the frame length before cutting begins. The frame length, gap length, and corner meeting points must be captured along the full sealing path so the strip follows a continuous run. This ensures cut accuracy supports uninterrupted seal continuity.
A strip cut too short leaves a visible gap at the end of a straight frame run, breaking seal continuity and reducing coverage along the sealing path. A strip cut too tightly at a corner meeting point can compress and bunch, affecting how the strip sits at transitions. In both cases, the result can be uneven contact, with either open gaps or restricted corner movement.
To prevent these issues, measuring and marking must separate straight runs from corner meeting points before any cutting takes place. Strip width, gap length, and compression allowance should be considered while marking the frame layout. This allows accurate trimming while maintaining consistent alignment across transitions. The steps below outline the process.
- Measure each frame run along the sealing path to record full frame length and gap length for continuous coverage.
- Mark corner meeting points clearly to define where straight runs transition into corner joints for precise cut accuracy.
- Check strip width against gap length and note compression allowance required at transitions.
- Cut the strip along marked lines to maintain alignment with the sealing path without shortening or over-tightening.
- Test-fit sections along straight runs and corners to confirm continuity before final installation.
This chart shows the three main steps to measure, cut, and test-fit weather stripping to avoid gaps or bunching.
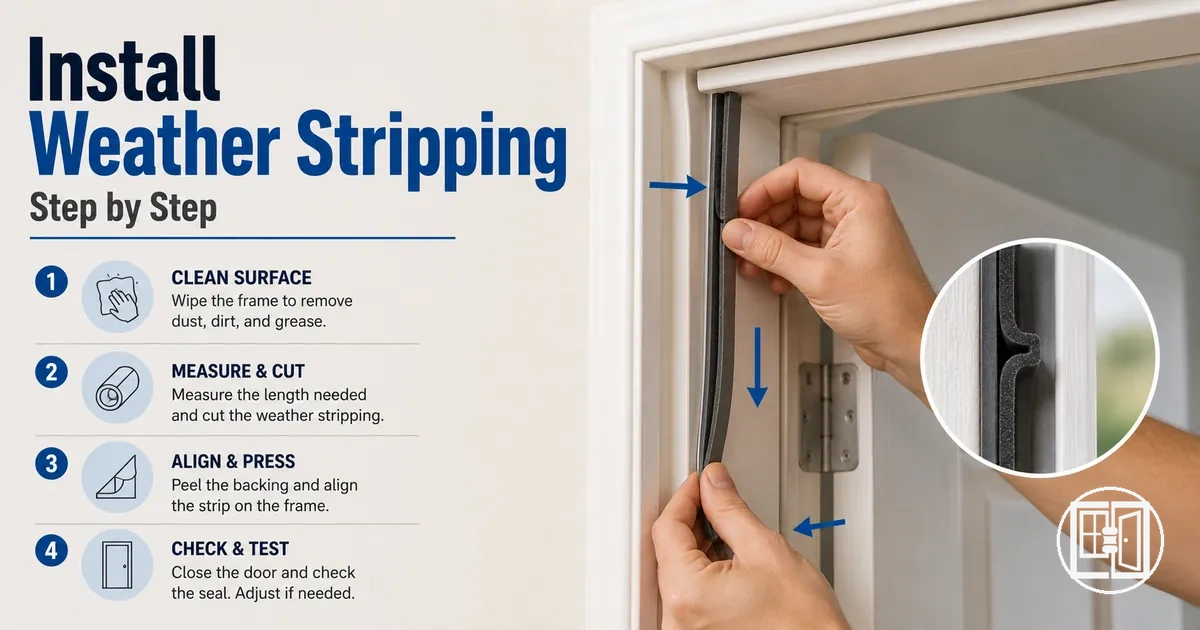
Installing Weather Stripping Around Door and Window Frames
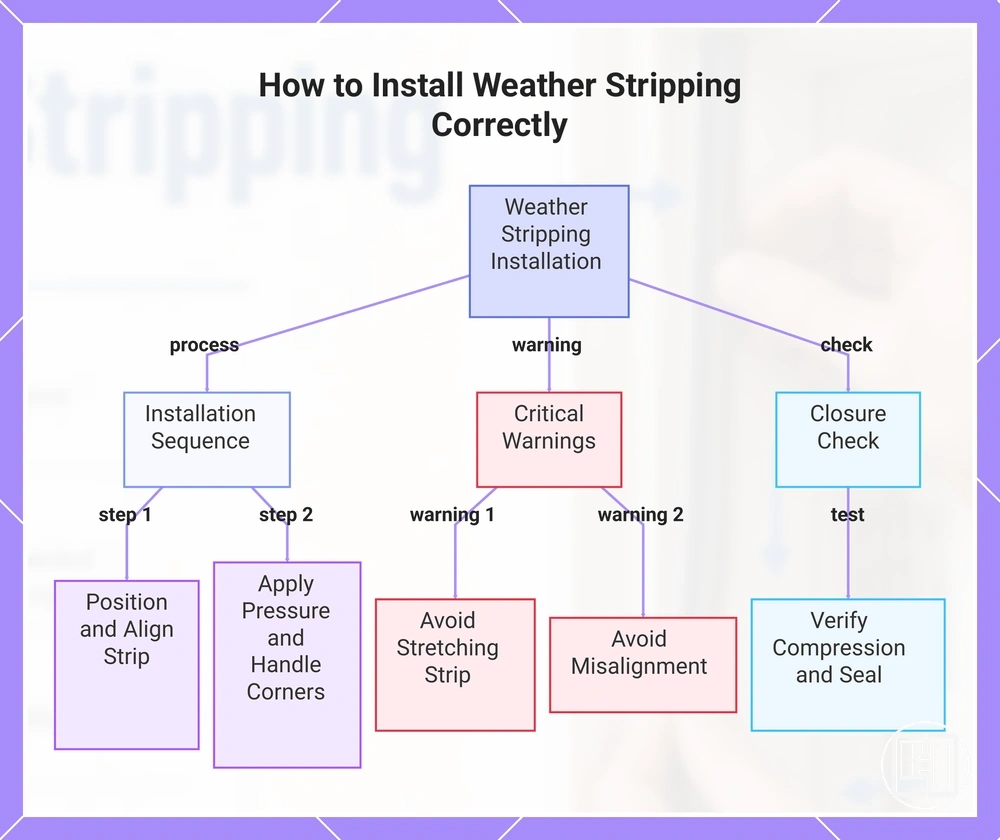
Installing weather stripping around door frame and window frame is carried out by positioning the strip along the alignment path, applying firm pressure, and checking continuity as the seal is formed. The strip must follow a controlled path so contact remains consistent across the frame edge. This supports continuous sealing around the full perimeter.
When installing weather stripping, rushing adhesive backing removal, misalignment along the alignment path, or stretching the strip can create weak points. These issues often affect corner handling and foam compression, which may interrupt contact at transitions between straight runs and corners. As a result, seal consistency can vary across the door frame and window frame.
Caution: the strip should be pressed into position gradually and not stretched, as stretching can distort alignment and reduce proper contact at corners and along the frame edge.
Follow this installation sequence to maintain alignment, pressure control, and closure accuracy across the full sealing path:
- Position the weather stripping at the starting point of the door frame or window frame and confirm alignment along the sealing path before removing adhesive backing.
- Peel the adhesive backing gradually while keeping the strip aligned to the frame edge to maintain controlled placement.
- Apply firm pressure along straight runs to secure adhesion and ensure consistent contact along the alignment path.
- Handle corners by guiding the strip into each corner handling point while maintaining foam compression to prevent gaps or bunching.
- Continue pressing along the frame edge, ensuring strip width remains properly seated on the contact surface.
- Check closure testing by gently closing the door or window to verify compression behavior and seal continuity.
This chart shows the key installation steps, critical warnings, and final closure check for installing weather stripping around door and window frames.
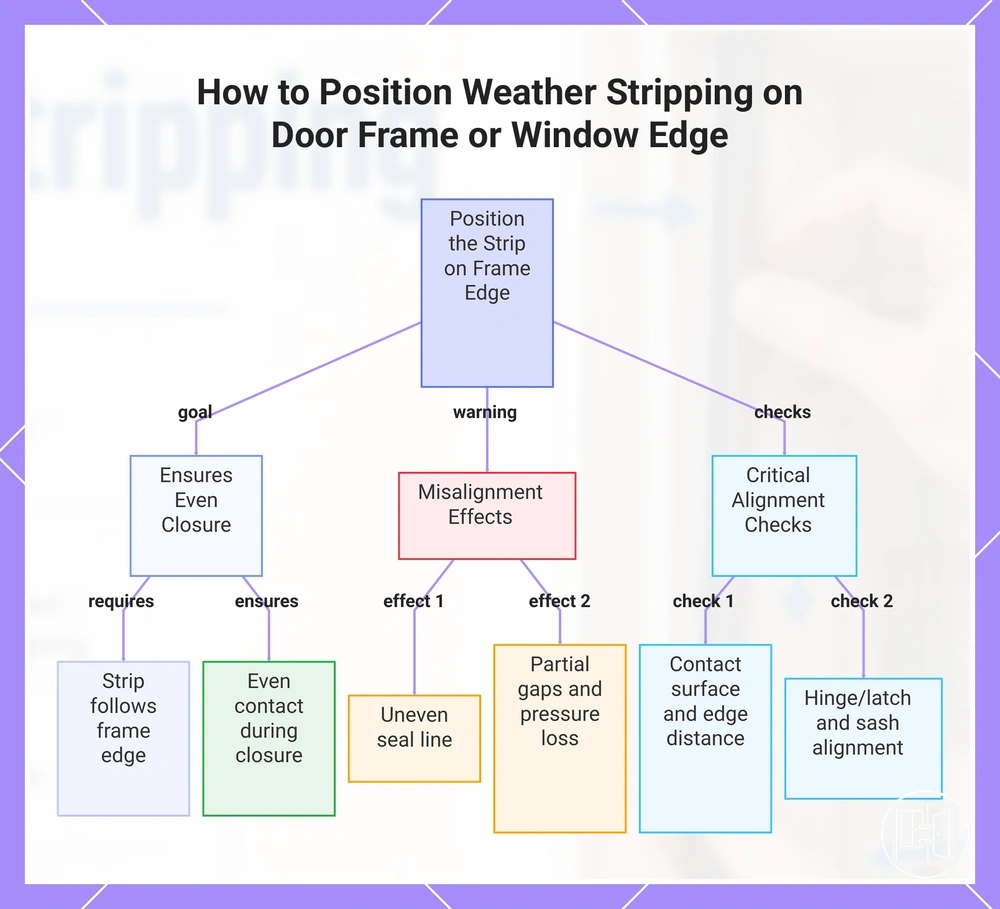
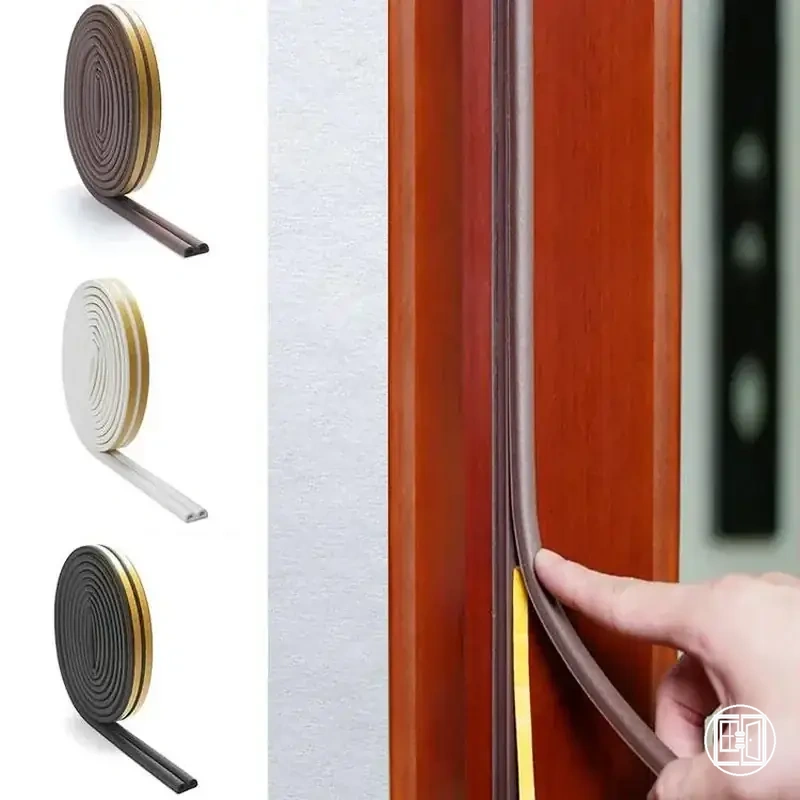
Positioning the Strip on the Door Frame or Window Edge
Positioning the strip on the door frame or window edge refers to placing the weather stripping along the correct contact surface before it is fixed to the alignment path. The strip must follow the frame edge so contact remains even during closure. This positioning step ensures even closure between the door frame and window edge. :contentReference[oaicite:0]{index=0}
When the strip shifts too far from the contact surface or leans toward the latch side or window sash, the seal line can become uneven and reduce contact quality during closing. Misalignment on the hinge side or corner transitions may also create partial gaps or uneven pressure distribution. These issues affect how evenly the frame closes against the strip, so alignment must be checked before pressing into place.
- Contact surface alignment: ensure the strip follows the intended seal line on the frame edge
- Edge distance control: maintain consistent spacing for even compression
- Hinge side and latch side balance: verify both sides meet evenly during closure
- Window sash alignment: confirm strip position matches the closing path of the sash
This chart shows the purpose, risks of misalignment, and key checks for correctly positioning weather stripping on the door frame or window edge.
Applying Adhesive-Backed Weather Stripping Without Stretching
Adhesive-backed weather stripping should be pressed into place without stretching to maintain its intended shape along the frame. The strip must sit flat during positioning so the adhesive-backed weather stripping supports a stable adhesive bond and reduces shrink-back along the seal line.
When backing removal is rushed or the strip is pulled tight during placement, alignment can shift and weaken contact on the door frame or window edge. Gradual placement with controlled firm pressure helps maintain the adhesive bond across the contact surface, while curing time may vary depending on product instructions and surface conditions.
The following steps separate peel, place, and press actions to protect the adhesive bond during installing weather stripping:
- Peel the adhesive backing gradually to maintain controlled exposure of the adhesive bond along the frame edge.
- Place the strip along the alignment path without stretching to preserve correct strip position on the contact surface.
- Press into place using firm pressure to secure consistent adhesion across the door frame or window edge.
- Avoid repositioning once contact is made to prevent weakening of the adhesive bond and misalignment of the seal line.
- Allow curing time where required according to product instructions so adhesion can stabilize under normal conditions.
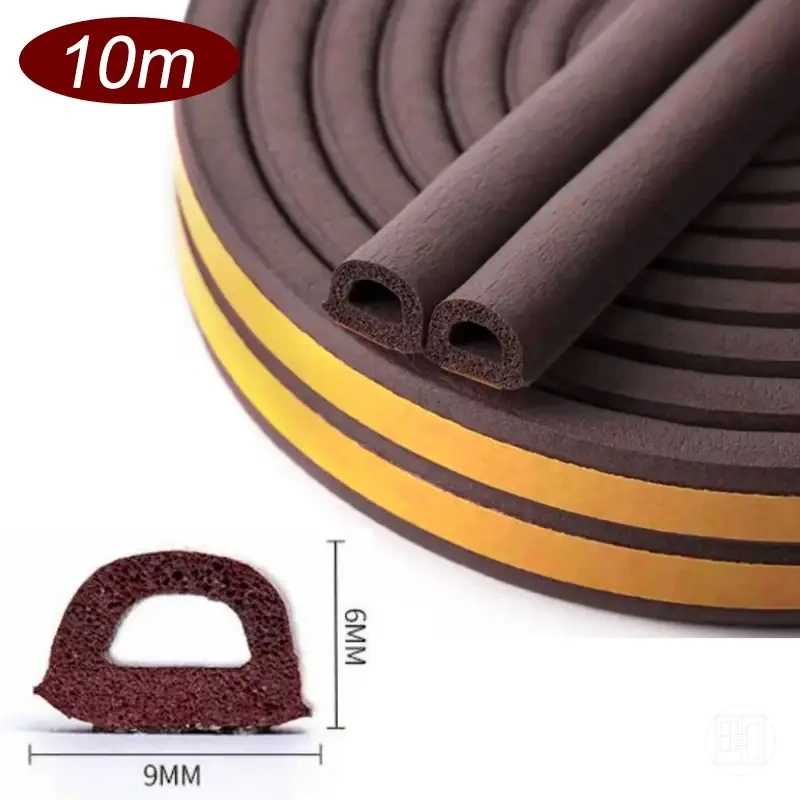
Fitting Foam Tape Into Gaps and Corners
Foam tape should match the visible gap depth and foam thickness so the strip fills the space evenly without distortion. Proper fitting allows foam tape to sit cleanly at the corner joint and maintain continuity along the seal line, where compression becomes the key condition for stable sealing behavior.
When foam thickness is greater than the gap depth, over-compression can occur and restrict proper closure pressure at the door frame or window edge. When foam is too thin, open seam formation may appear at corner joints, reducing continuity and affecting rebound after closing. A controlled closure test helps confirm whether the foam tape seats correctly across the full corner path.
To verify correct fitting at corners and gaps, the following checks help ensure alignment and compression consistency:
- Gap depth vs foam thickness: ensures foam tape compresses evenly without over-compression or loose fit
- Corner joint alignment: confirms clean meeting points without open seam formation
- Closure pressure response: checks whether the foam compresses uniformly when the frame closes
- Rebound behavior: confirms foam returns appropriately after opening to maintain seal continuity
- Seal line continuity: verifies that no breaks appear along corners or straight runs
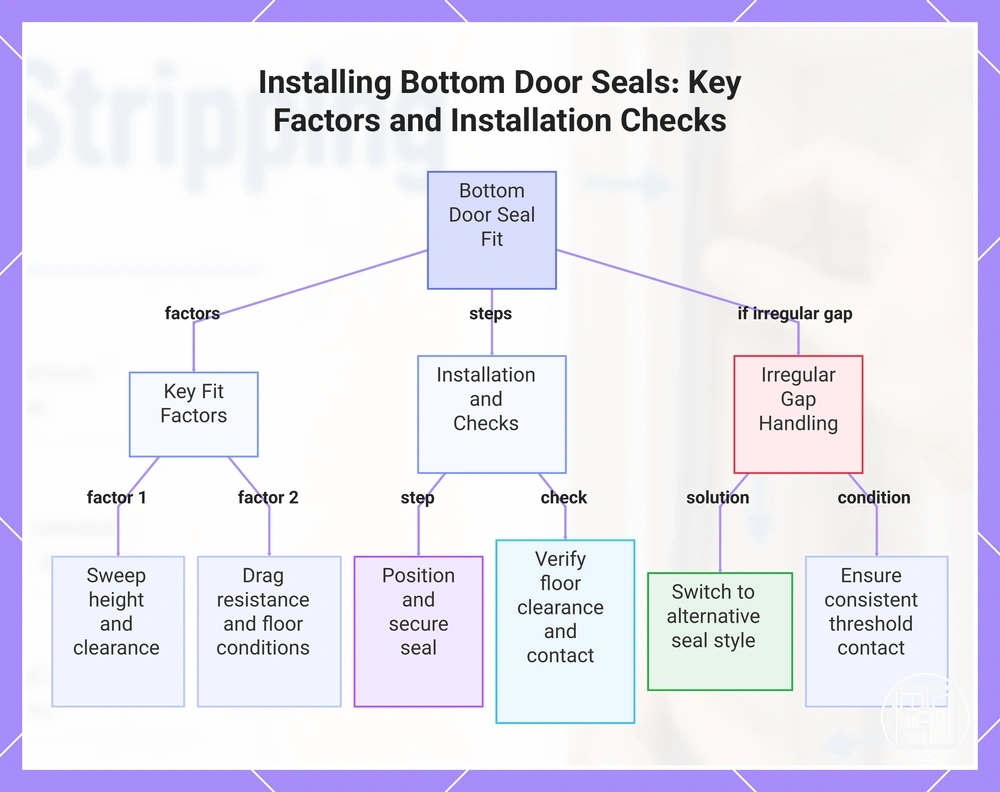
Installing Bottom Door Seals and Draft Strips
Bottom door seals and draft strips depend on floor clearance and threshold contact to control how the door bottom meets the floor during closing. A bottom door seal works directly at the door bottom where sweep height, door swing, drag resistance, and uneven floor conditions determine contact behavior. This differs from frame-edge weather stripping because performance is driven by floor-level interaction rather than side compression. :contentReference[oaicite:0]{index=0}
Fit at the bottom edge is defined by sweep height alignment against floor clearance while maintaining controlled drag resistance during door swing. If the sweep sits too low, drag resistance may increase; if it sits too high, threshold contact may be incomplete. Uneven floor conditions can also shift how the draft strip engages across the door bottom, so final fit depends on installation alignment and clearance conditions.
Installation of a bottom door seal or draft strip typically involves positioning along the door bottom edge and securing it using adhesive fixing or screw-on fixing depending on the door structure. The installation check should confirm floor clearance, sweep contact, drag resistance, fixing stability, and uneven floor response before final use. This ensures the draft strip sits correctly against the threshold without unnecessary restriction during door movement.
When the bottom gap is highly irregular or exceeds practical sweep adjustment, a different seal style may be required instead of increasing foam or draft strip thickness. In these cases, the decision depends on whether threshold contact can be maintained consistently across the door bottom under normal swing conditions.
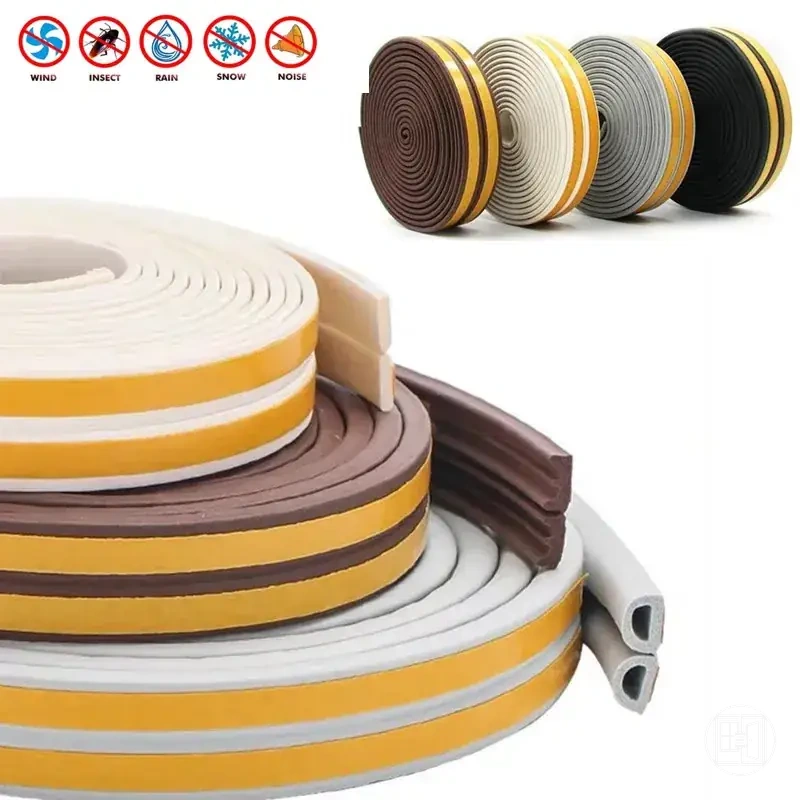
Here are product examples that may make comparison easier. Before buying, always review the compatibility criteria, essential features, and product details.
This chart outlines the main factors affecting bottom door seal performance, the installation process and checks, and how to handle irregular gaps.
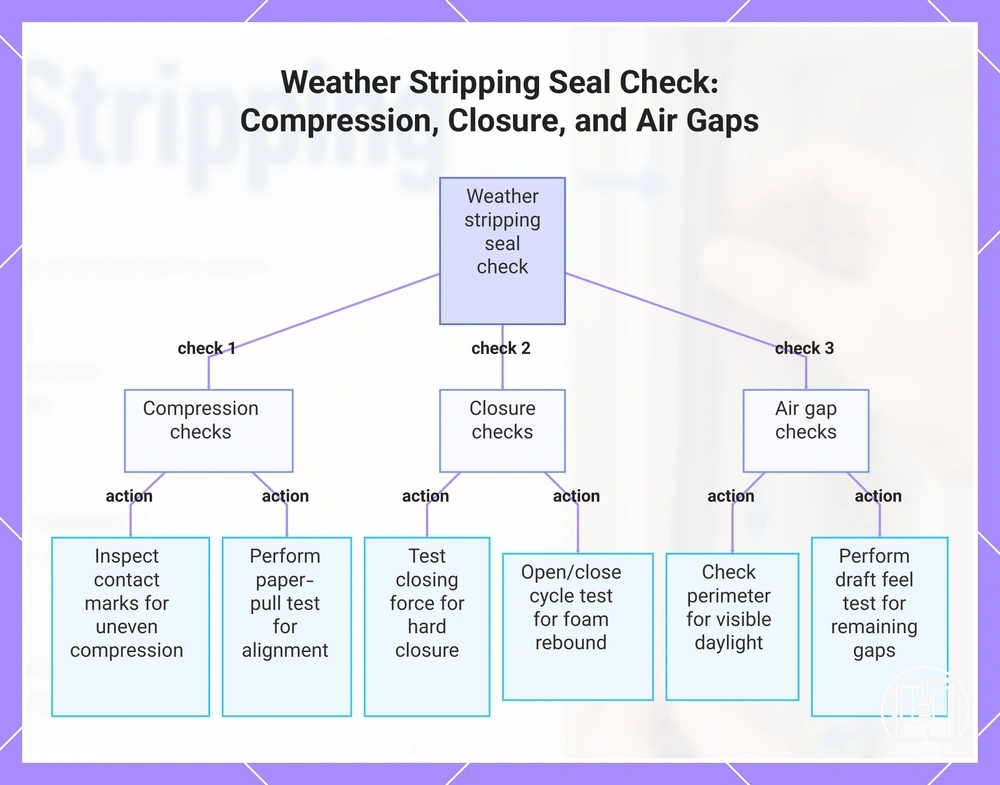
Checking Compression, Closure, and Remaining Air Gaps
Compression and closure after installation determine whether weather stripping is sealing correctly along the contact line. The seal should compress evenly without blocking normal door or window movement, and this confirms proper seal contact during closure. :contentReference[oaicite:0]{index=0}
Paper-pull checks, visible daylight, and uneven compression help verify whether the installed strip is aligned correctly across the closing path. If paper slides too easily, light is visible through edges, or pressure is inconsistent, these symptoms indicate variation in seal contact. This is typically read through symptom–cause–action logic focused on compression and closure behavior.
Hard closure, foam rebound, and loose adhesive edges can indicate installation stress or movement after closing cycles. Excess force during closing may suggest over-compression, while weak rebound can reduce consistent sealing performance over time. Loose adhesive edges may shift the installed seal line and should be checked before any adjustment to positioning or pressure is made.
When remaining air gaps are still detected, the cause may not always be the installed seal line itself. Air paths can originate from surrounding alignment or structural areas outside the compression zone of the strip. In such cases, broader diagnosis may be needed through fix air leaks.
Diagnostic checklist: Compression and closure verification
Use the following checks to evaluate installation performance after closing:
- Compression | Uneven compression | Inspect contact marks along frame | Indicates inconsistent sealing pressure
- Closure | Hard closure | Test closing force during operation | Suggests over-compression or misalignment
- Seal contact | Visible daylight | Check perimeter under low light | Indicates incomplete sealing path
- Air leakage | Remaining air gaps | Perform draft feel test | Shows possible incomplete closure sealing
- Adhesion | Loose adhesive edge | Inspect strip edge stability | May cause seal line shifting
- Material response | Foam rebound | Open and close cycle test | Indicates recovery consistency
Remaining air gaps should be interpreted in context, as they may result from alignment conditions beyond the installed strip area rather than the seal alone.
This chart shows the main checks to verify weather stripping compression and closure after installation, covering uneven compression, hard closure, visible daylight, and remaining air gaps.
Installation Mistakes That Cause Gaps, Peeling, or Failed Seals
Most installation mistakes create gaps, peeling, hard closure, or weak seal contact after weather stripping is fitted. These installation mistakes affect compression, adhesion, and alignment along the installed seal line, leading to error-condition-effect outcomes such as seal failure or reduced closure performance.
Dirty surface, damp frame, and old adhesive are common installation mistakes that weaken adhesion and increase peeling risk. These conditions reduce proper bonding between the strip and the frame surface and can lead to early adhesive failure along the seal line. Preparation through cleaning and drying before application helps reduce these installation errors and supports stable adhesion.
Lead-in: The table below links installation mistakes with their conditions, effects on the seal, and corrective actions using error-condition-effect-fix logic.
| Mistake | Condition that causes it | Effect on the seal | Fix or prevention |
|---|---|---|---|
| Dirty surface | Dust, grease, or residue left on frame | Weak bonding and adhesive peeling | Clean and dry frame before installation |
| Damp frame | Moisture present during application | Reduced adhesion and failed seals | Ensure full drying before fitting strip |
| Stretched adhesive tape | Pulling strip during placement | Shrink-back creating gaps | Apply without stretching and align gradually |
| Poor measuring | Incorrect length or miscalculation | Short ends and seal gaps | Measure full sealing path before cutting |
| Corner gaps | Poor corner alignment or cutting | Broken seal continuity | Align corners before final pressing |
| Over-thick foam | Foam size not matching gap depth | Blocked closure or excess compression | Select appropriate thickness for clearance |
| Blocked closure | Excess compression or misalignment | Hard closure and movement restriction | Reposition to restore smooth closure |
| Missed post-installation check | No verification after fitting | Undetected gaps or peeling edges | Perform post-installation check after setup |
Placement and compression-related installation mistakes such as stretched adhesive tape, poor measuring, corner gaps, over-thick foam, and blocked closure often combine to create seal continuity issues and failed seals. These issues should be corrected by addressing the underlying installation error rather than assuming product-related failure without evidence.
After installation mistakes are identified, prevention depends on consistent installation discipline and routine verification. A maintenance tips check can help reduce recurring installation errors and support stable sealing performance.
Here are product examples that may make comparison easier. Before buying, always review the compatibility criteria, essential features, and product details.