Window and door weather stripping replacement for a continuous seal
Window and door weather stripping replacement for a continuous seal is the process of removing worn sealing strips and restoring contact between the frame and the door or window edge. The weather stripping supports a continuous seal by reducing gaps that allow draft, moisture, or light movement through worn seal points. When the adhesive weakens or compression is lost, the frame contact becomes inconsistent, and replacement becomes a fit-and-seal task focused on restoring stable edge contact.
Old weather stripping often fails due to wear, compression loss, adhesive failure, poor fit, or surface mismatch that develops over time. These conditions usually occur when the seal can no longer maintain steady pressure between the door, window, and frame, which creates gaps and reduces sealing consistency. Because these changes can vary across different frames and materials, inspection of the seal and frame is needed before removal.
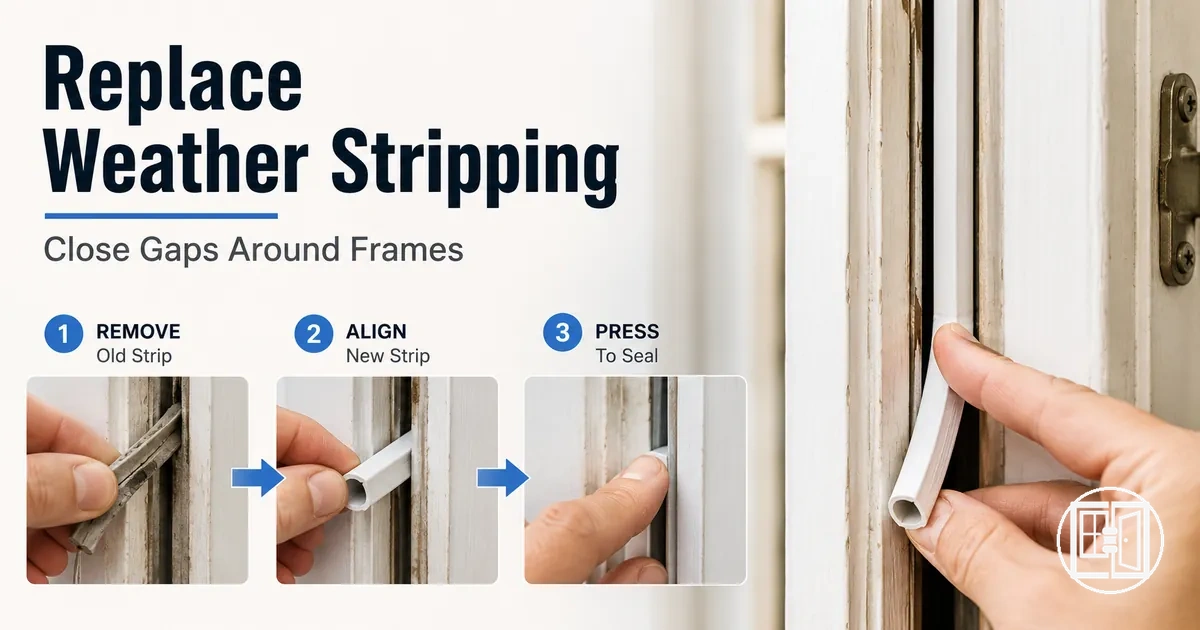
The replacement process typically involves removing the worn seal, preparing the contact surface, matching the correct profile, fitting the new strip, and checking seal continuity along the frame. Each stage focuses on restoring consistent contact so the weather stripping can function as a continuous seal across doors and windows. Understanding replacement timing helps determine when to move from inspection to full replacement work.
This process is different from first-time installation or general product selection because it begins with an existing worn seal rather than a new frame setup. The focus stays on restoring lost compression and correcting gap formation rather than comparing materials or choosing between seal types.
When weather stripping should be replaced
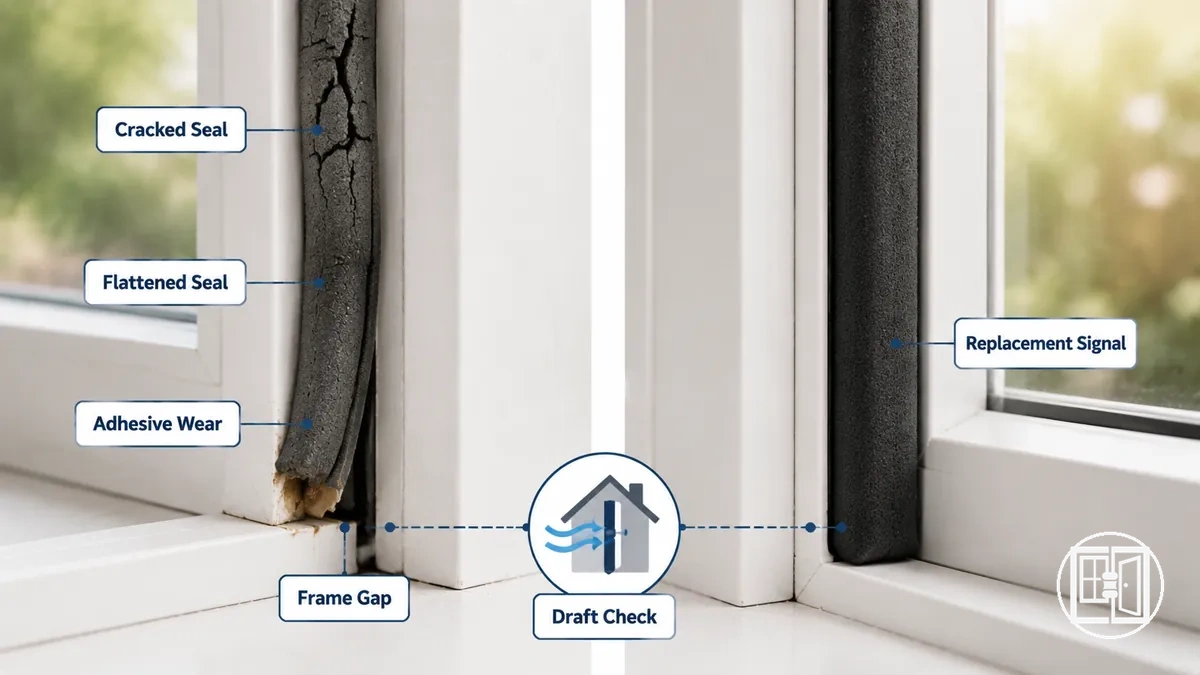
When weather stripping should be replaced depends on visible condition and how well the old seal still controls contact along the frame. Replacement timing becomes necessary when the weather stripping can no longer maintain consistent compression or adhesion across the door or window edge. This decision should be based on both physical wear and how the seal behaves during closing, not on a single symptom alone.
Visible damage is a clear indicator for replace decisions. Cracking, flattening, peeling edges, or sections pulling away from the frame often show that the adhesive or material structure has weakened. These changes reduce stable seal contact and can increase gaps along the frame, especially where pressure from closing is no longer evenly distributed.
Performance-related signals appear when the old seal no longer supports steady closure behavior. Drafts, moisture marks, or uneven closing pressure may occur, but these can also be influenced by frame alignment, threshold conditions, or hardware wear. Because of this, replacement decisions should separate seal-related damage from structural or alignment issues that may require different corrections.
When weather stripping should be replaced can be clarified through a focused check that compares visible wear with sealing performance rather than isolated symptoms.
This checklist helps identify replacement-worthy conditions in the old seal while separating them from minor maintenance or adjustment needs. Use it to evaluate both damage and functional loss before deciding to replace.
- Cracking or splitting that shows the weather stripping material has degraded and can no longer maintain full contact
- Flattened compression indicating the seal no longer rebounds against the frame during closing
- Peeling or weak adhesive hold causing sections of the strip to detach from the frame
- Consistent light gaps during closing that remain after basic frame alignment checks
- Moisture marks along the seal line suggesting reduced barrier consistency
- Uneven closing pressure across the door or window indicating inconsistent seal contact
- Persistent drafts that remain after cleaning contact areas and checking alignment
Understanding replacement timing also connects to long-term seal lifespan care, especially when wear develops faster due to usage patterns, exposure, or frame conditions that affect compression and adhesive stability.
Physical damage, loose adhesive, and compression loss
Physical damage, loose adhesive, and compression loss describe visible conditions in weather stripping that indicate reduced sealing function. These attributes affect how the seal material maintains contact with the frame and often result in poor contact where gaps or drafts may develop.
Physical damage appears as cracking, splitting, or tearing in the seal material, showing structural breakdown that reduces continuous contact. Loose adhesive is identified by peeling edges, lifted sections, or visible residue along the mounting line, which weakens frame attachment. Compression loss shows up as flattening or a lack of rebound in the strip, reducing its ability to press firmly against the frame surface.
In doors, these issues often appear along high-movement edges where repeated closing increases wear and adhesive separation. In windows, they may show as uneven compression or localized gaps where frame contact is inconsistent due to reduced seal flexibility or material fatigue.
The close-up view below illustrates physical damage, loose adhesive, and compression loss on weather stripping, highlighting how these conditions affect frame contact.
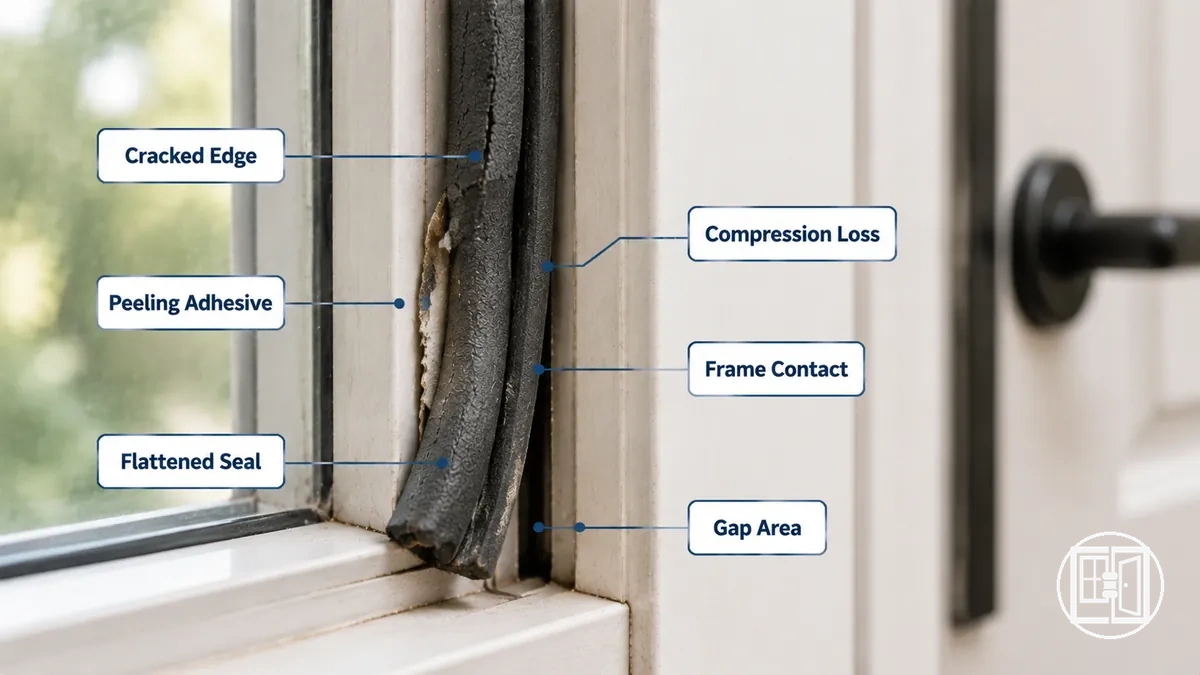
These attributes can be assessed quickly by checking whether the seal material remains intact, firmly bonded, and capable of rebounding against the frame during closing.
Drafts, moisture, and closing problems after the seal fails
Drafts, moisture, and closing problems after the seal fails indicate that the weather stripping is no longer maintaining proper contact along the frame. When the seal fails, air and moisture control weakens and closing problems become inconsistent, although similar symptoms can also appear due to frame movement or hardware alignment. In these cases, the seal line should be inspected to confirm whether the old seal is the main source of poor performance.
Failed weather stripping affects how air, light, and moisture move through the frame gap, so symptoms often appear during everyday closing and environmental changes.
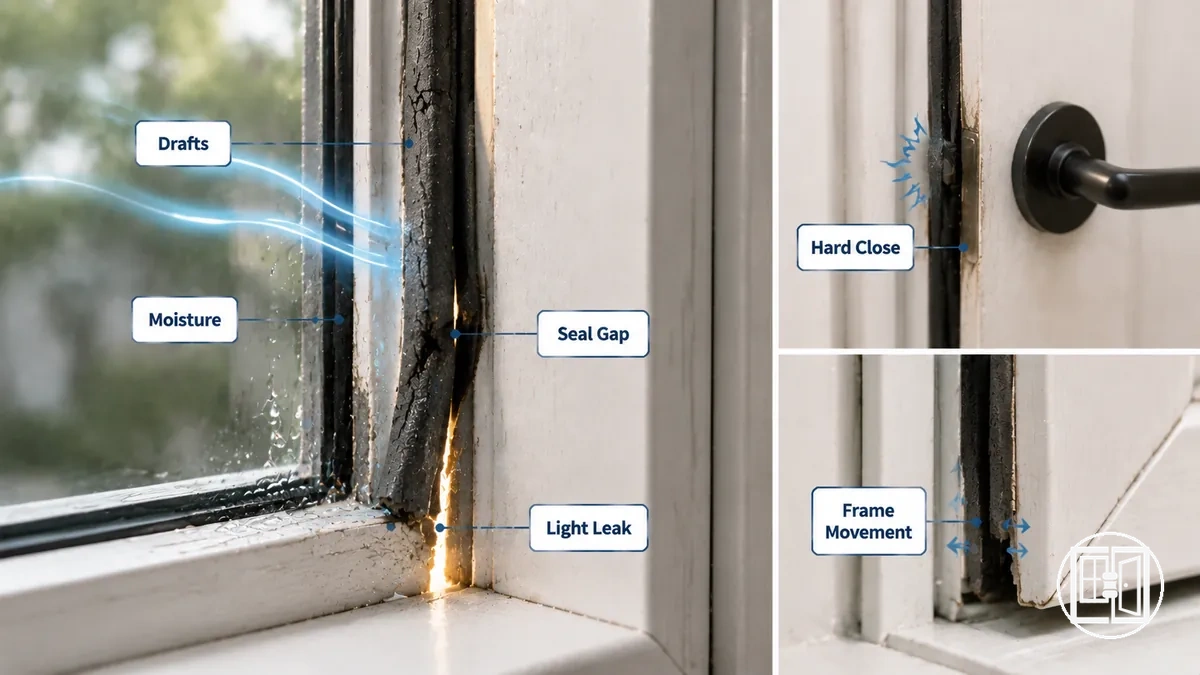
Use the symptom pattern below to understand how drafts, moisture, and closing problems may relate to seal failure and what to check on the weather stripping surface and frame contact area.
- Drafts → reduced seal contact → check for gaps along the seal line where air passes through uneven compression
- Light leak → worn or flattened seal → inspect whether the strip no longer fills the frame edge consistently
- Moisture marks → weakened barrier performance → check lower frame areas where water exposure collects
- Rattling → loose seal or poor adhesion → inspect whether the strip has detached or lost stable bonding
- Rubbing → uneven compression or misaligned seal → check whether the seal profile is interfering with smooth closing
- Hard closing → over-compression or damaged profile → inspect whether the seal is resisting normal door or window movement
These symptoms are not always caused only by the weather stripping, since frame movement, threshold wear, or hardware alignment can create similar effects. If drafts or moisture continue after checking and replacing the seal, further inspection of the frame and alignment conditions may be required.
Tools and replacement materials to prepare before removal
Tools and replacement materials to prepare before removal refer to the basic tools and materials needed to safely remove the old seal and install a replacement strip without damaging the frame surface. Preparation should match the old seal type and frame surface because adhesive-backed, kerf strip, and compression-strip systems require different handling, and this reduces removal errors and fit issues.
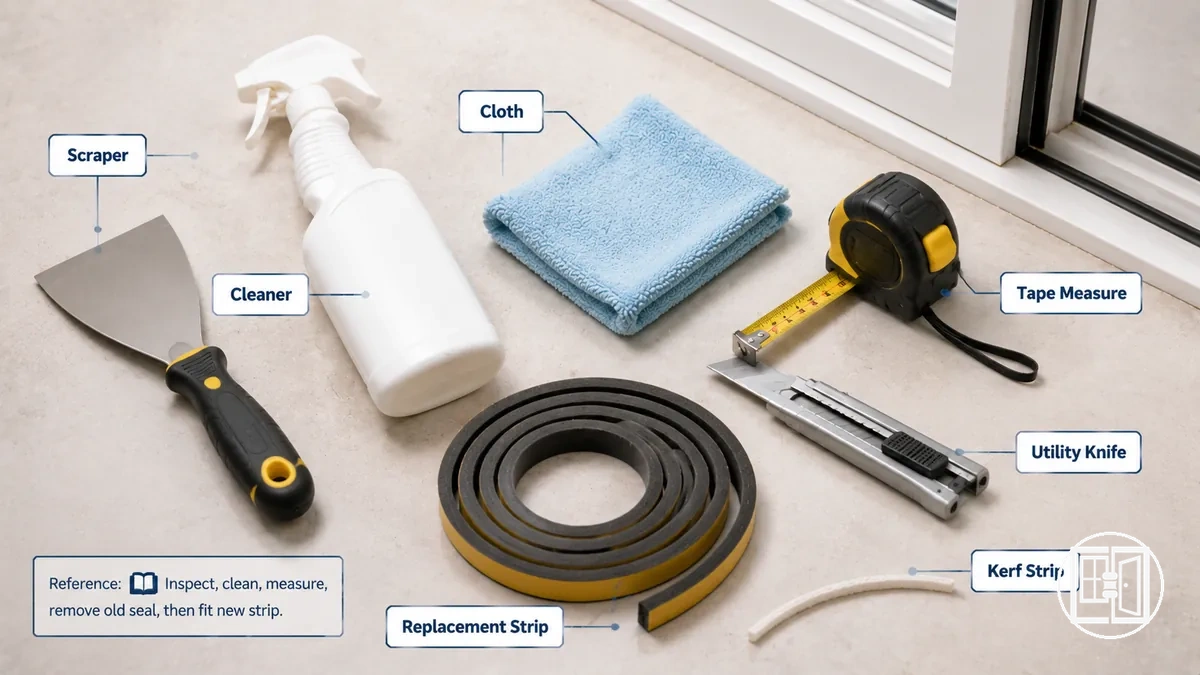
Tools used for removal focus on lifting or releasing the old seal cleanly. A scraper or putty knife helps remove adhesive-backed strips and residue, while kerf strip or compression-strip systems may require careful pulling to avoid damaging the channel or frame edge.
Replacement materials support accurate fitting after removal. Cleaner and cloth prepare a dry surface for adhesion, while a tape measure ensures correct length before cutting with a utility knife or scissors. The replacement strip must match the frame profile and sealing type, and adhesive tape may be used when additional bonding support is needed.
The checklist below organizes the tools and replacement materials to prepare before removal, separating removal, cleaning, measuring, and fitting tasks for different seal types.
- Scraper or putty knife → removes old adhesive-backed seal and surface residue without damaging the frame
- Cleaner → prepares the frame by removing dust and adhesive residue for better surface contact
- Cloth → dries and wipes the surface to ensure clean bonding conditions
- Tape measure → checks frame length for accurate cutting of the replacement strip
- Utility knife → cuts replacement strip to match required size during fitting
- Replacement strip → new sealing material selected to match the existing frame type
- Adhesive tape → supports attachment where extra bonding is required for adhesive-backed systems
- Kerf strip consideration → ensures correct handling of compression or channel-based seal systems during removal and fitting
Removing old weather stripping without damaging the frame
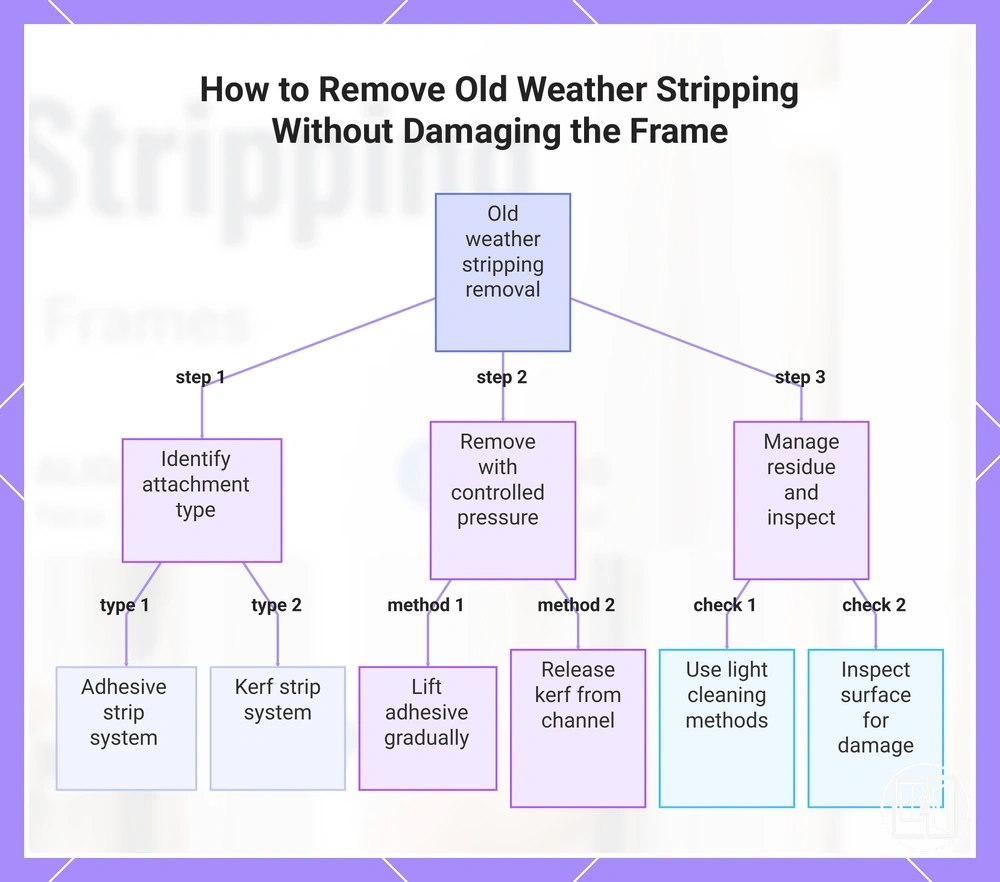
Removing old weather stripping without damaging the frame requires first identifying the attachment type, because removing old weather stripping behaves differently depending on whether the frame uses an adhesive strip or a kerf strip system. The correct approach is to identify the attachment method first, then remove it with controlled pressure that preserves the frame surface for replacement.
Controlled removal depends on managing pull direction along the line of the seal. Adhesive strip systems should be lifted gradually from the surface, while kerf strip systems are released from their channel using steady pull-out movement. In both cases, removing old weather stripping should avoid sudden force that can stress painted frame, timber, aluminium, or uPVC surfaces.
Residue and surface condition must be managed after initial detachment. Adhesive-backed strips may leave residue on the frame, which should be treated carefully using light cleaning methods suitable for the material. Cleaner and cloth use depends on the surface type, since painted frame and uPVC surfaces can react differently to aggressive cleaning pressure.
After removing old weather stripping, the exposed channel or surface should be inspected to confirm it is clean and free from obstruction. This inspection ensures the frame is ready for the replacement strip and helps identify any damage caused during removal that could affect future sealing performance.
A caution applies to adhesive strip removal where tearing occurs, as uneven residue can remain on the surface and require slower, controlled cleanup to avoid damaging the underlying frame material.
- Identify attachment type by checking whether the weather stripping is an adhesive strip or kerf strip system, as this determines safe removal behavior.
- Set pull direction along the seal edge and begin lifting with gentle pressure to reduce stress on the frame surface.
- Remove adhesive strip gradually or release kerf strip from its channel using steady pull-out movement instead of force.
- Control residue carefully using light cleaning methods when needed, adjusting based on painted frame or uPVC sensitivity.
- Inspect exposed surface or channel after removal to confirm it is clean, stable, and ready for replacement installation.
- Pause removal if resistance increases to avoid damaging timber, aluminium, or coated frame materials.
This chart shows the three main steps to safely remove old weather stripping while preserving the frame surface for replacement.
Pull-out, peel-off, and kerf-strip removal differences
Pull-out, peel-off, and kerf-strip removal differences are defined by the attachment method of the old weather stripping, because attachment type directly changes removal motion, frame risk, and cleanup behavior. Adhesive-backed, friction-fit, compression seal, and kerf-strip systems require different removal handling to avoid damaging the frame surface.
Peel-off applies mainly to adhesive-backed strips that detach from the surface in a lifting motion, often leaving residue depending on bond strength and age. Pull-out applies to friction-fit and some compression seal types where the strip is extracted through controlled release of contact pressure along the frame. Kerf-strip removal involves sliding or pulling material out of a channel, where incorrect direction or force can increase frame risk and damage the slot. Cleanup needs also vary, from light surface wiping for adhesive residue to minimal channel cleaning for kerf systems.
| Attachment type | Removal motion | Frame or cleanup risk |
|---|---|---|
| Peel-off (adhesive-backed) | Lift and peel from surface | Possible residue on frame surface depending on adhesive condition |
| Pull-out (friction-fit / compression seal) | Steady extraction following contact line | Moderate frame risk if pulled against compression direction |
| Kerf-strip (channel fit) | Controlled pull-out from channel | Higher risk if channel edges are stressed during removal |
Cleaning adhesive residue before fitting the new strip
Cleaning adhesive residue before fitting the new strip ensures that the exposed surface can support stable adhesion and alignment, because remaining adhesive residue can reduce clean contact between the frame and the new strip. A properly prepared surface improves how the new strip sits across different frame material finishes and reduces the risk of uneven bonding caused by leftover glue residue or oily residue.
Preparation of the exposed surface focuses on controlled removal and readiness checks before installing the new strip.
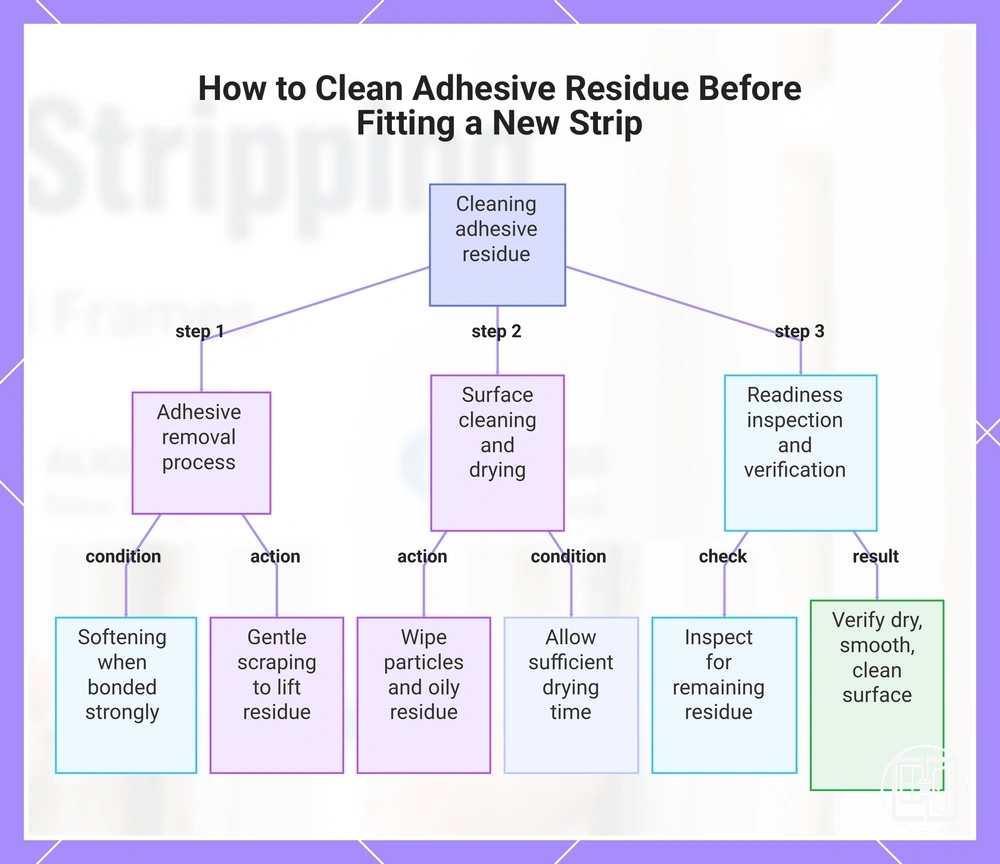
- Softening adhesive residue when needed based on how strongly it is bonded, checking that the surface begins to release glue residue without damaging the frame material.
- Applying gentle scraping to lift loosened adhesive residue, ensuring the exposed surface remains even and suitable for the new strip.
- Wiping the area to remove loosened particles and checking for any oily residue that may interfere with clean contact.
- Allowing sufficient drying time so the exposed surface becomes fully ready for adhesion and alignment of the new strip.
- Inspecting the surface to confirm that no adhesive residue remains and that the area is stable and clean for installation.
- Verifying readiness when the exposed surface is dry, smooth, and free from residue that could affect bonding.
In cases where adhesive residue is stubborn, gradual removal is preferred rather than force, since aggressive cleaning may affect certain frame material finishes and leave uneven conditions that reduce adhesion quality for the new strip.
This chart shows the three main stages of cleaning adhesive residue from a surface before installing a new strip: removal, cleaning and drying, and readiness inspection.
Matching the replacement strip to the gap, frame, and seal channel
The replacement strip depends on the gap, frame, seal channel, and compression space, because the fit must match the existing contact geometry before cutting or installing it. A replacement strip that does not align with the gap depth, seal profile, or surface condition can create poor sealing performance, so the replacement must match the gap and frame contact point before installation.
Gap depth and compression space determine how the replacement strip behaves when the frame closes. If the compression space is too limited, the replacement strip may resist closure and increase movement stress on the frame. If the gap is too wide, the strip may not maintain stable contact, leading to reduced sealing efficiency.
Seal channel type or surface attachment method also controls compatibility. A kerf-based seal channel requires a profile that can seat securely inside the channel, while adhesive-backed or surface-mounted options depend more on consistent surface condition and stable contact area along the frame.
The table below shows how key frame conditions relate to replacement strip compatibility before cutting or installation.
| Frame or opening | Attribute or criterion | Value or condition | Effect or decision |
|---|---|---|---|
| Gap depth | Opening size | Shallow / medium / deep | Determines replacement strip thickness and reach |
| Seal channel | Attachment structure | Kerf / surface-mounted | Defines seating method and profile fit |
| Compression space | Closing allowance | Low / balanced / high | Controls sealing pressure and closing resistance |
| Surface condition | Frame contact quality | Clean / uneven / worn | Influences adhesion stability and alignment |
An undersized replacement strip can leave gaps along the frame, reducing contact and allowing drafts. An oversized strip can create over-compression, making closing harder and affecting normal movement. Proper matching of gap depth, seal channel, and compression space helps avoid both conditions.
Replacing door weather stripping around the jamb and threshold
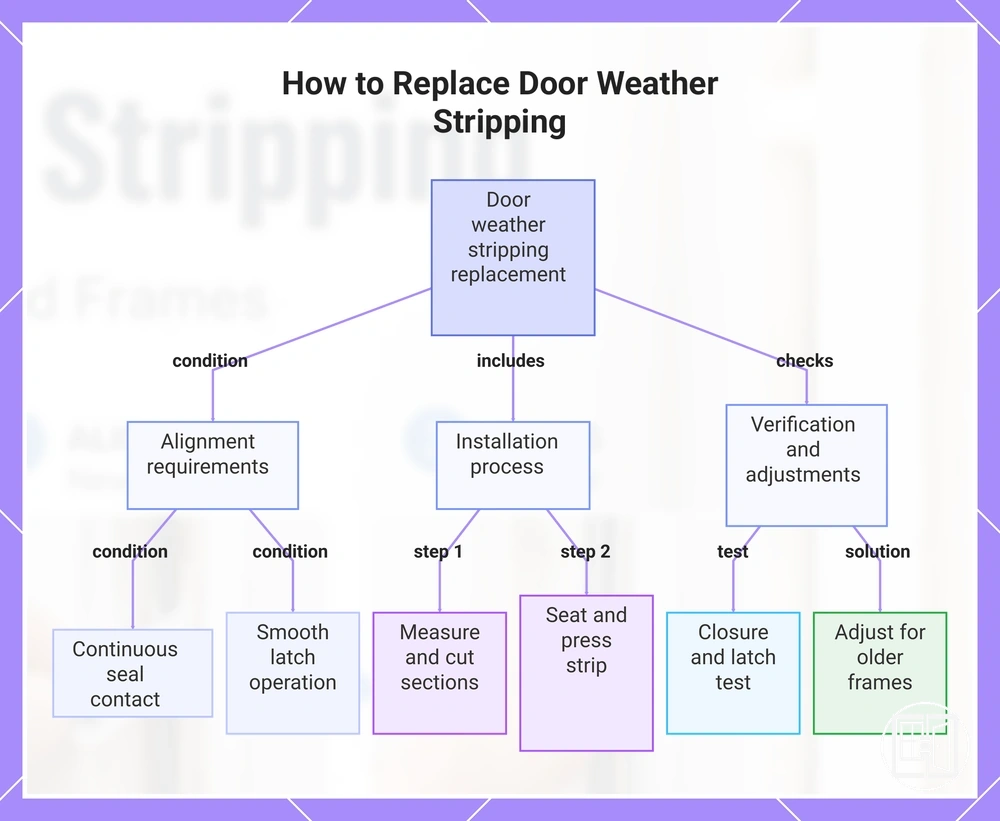
Door weather stripping around the jamb and threshold must maintain continuous contact between the door weather stripping, the jamb, the door stop, and the threshold so the seal closes evenly without blocking latch operation. The replacement must be aligned so corner continuity remains stable while supporting normal latch operation across all edges.
Replacement starts by aligning measurements across the side jamb, top jamb, and threshold strip so the door weather stripping follows the full perimeter without gaps or over-compression. The strip must be prepared with accurate measuring and cutting so each section meets cleanly at the corners and maintains continuous seal contact.
Before fitting, the general fitting approach follows the installation steps to ensure correct alignment and controlled seating along the frame.
- Side jamb measurement → measure the door weather stripping along the left and right jamb → verify full edge coverage without gaps or excess length.
- Top jamb measurement → measure the top jamb section of the door weather stripping → verify alignment with side jamb corners for corner continuity.
- Threshold measurement → measure the threshold strip along the bottom edge → verify clearance for smooth latch operation without resistance.
- Cutting clean ends → cut door weather stripping to match jamb and threshold lengths → verify tight corner joints without overlapping or open gaps.
- Seating and pressing → press the strip into the jamb, door stop, and threshold contact points → verify stable adhesion and consistent continuous seal along all edges.
- Closure and latch test → close the door and test latch operation across the jamb and threshold → verify smooth closure without over-compression or seal displacement.
In older doors, uneven jambs, worn door stops, or irregular thresholds may affect alignment, so the door weather stripping may require minor adjustment during seating to maintain continuous seal contact while still allowing stable latch operation and corner continuity.
This chart shows the key requirements, installation steps, and verification checks for replacing door weather stripping around the jamb and threshold.
Measuring, cutting, and seating the new door seal
Measuring, cutting, and seating the new door seal determine whether the new door seal achieves correct corner fit and stable contact, because accurate measuring, controlled cutting, and proper seating directly affect pressure direction, adhesive contact or kerf seating, and final compression check across the frame.
The sequence below focuses on local actions that ensure the new door seal aligns cleanly with the frame and maintains consistent corner performance:
- Measurement point → measure the frame length for the new door seal along each section → verify the measured length matches the installation line without stretching or slack.
- Cut allowance → apply careful cutting based on each measured segment → verify clean ends that support stable corner fit without deformation.
- Corner fit → align the cut ends at each corner → verify edges meet without gaps or overlap that could break continuity.
- Pressure direction → apply seating pressure evenly along the seal line → verify adhesive contact or kerf seating remains stable without shifting.
- Compression check → close the door to test final compression → verify uniform contact without over-compression or open gaps along the seal.
A short cut at a corner can create a visible light gap because it interrupts corner fit and weakens both adhesive contact and kerf seating, reducing effective compression check at the joint area.
Door bottom seals and threshold strips during replacement
Door bottom seal refers to the sealing element along the bottom edge of a door, and it behaves differently from jamb seals because it depends on threshold contact, floor clearance, and sweep height rather than side compression. The interaction between the door bottom seal and the threshold strip determines how consistently the bottom edge maintains contact during movement, making clearance control essential for replacement fit and performance.

- Sweep height mismatch → incorrect threshold contact → reduced sealing along the bottom edge
- Threshold strip wear or uneven surface → inconsistent contact → partial gaps during door closure
- Fasteners or adhesive condition → weak retention → shifting of the door bottom seal during movement
- Floor clearance too tight → increased drag → resistance during opening or closing
- Water exposure at lower edge → gradual seal wear → reduced durability at threshold contact zone
- Drag from misalignment → uneven movement → unstable contact across the threshold strip
In some cases, a worn or uneven threshold may need adjustment before a new door bottom seal can function correctly, since irregular threshold conditions can limit effective sweep height and disrupt stable bottom edge contact even when installation is correct.
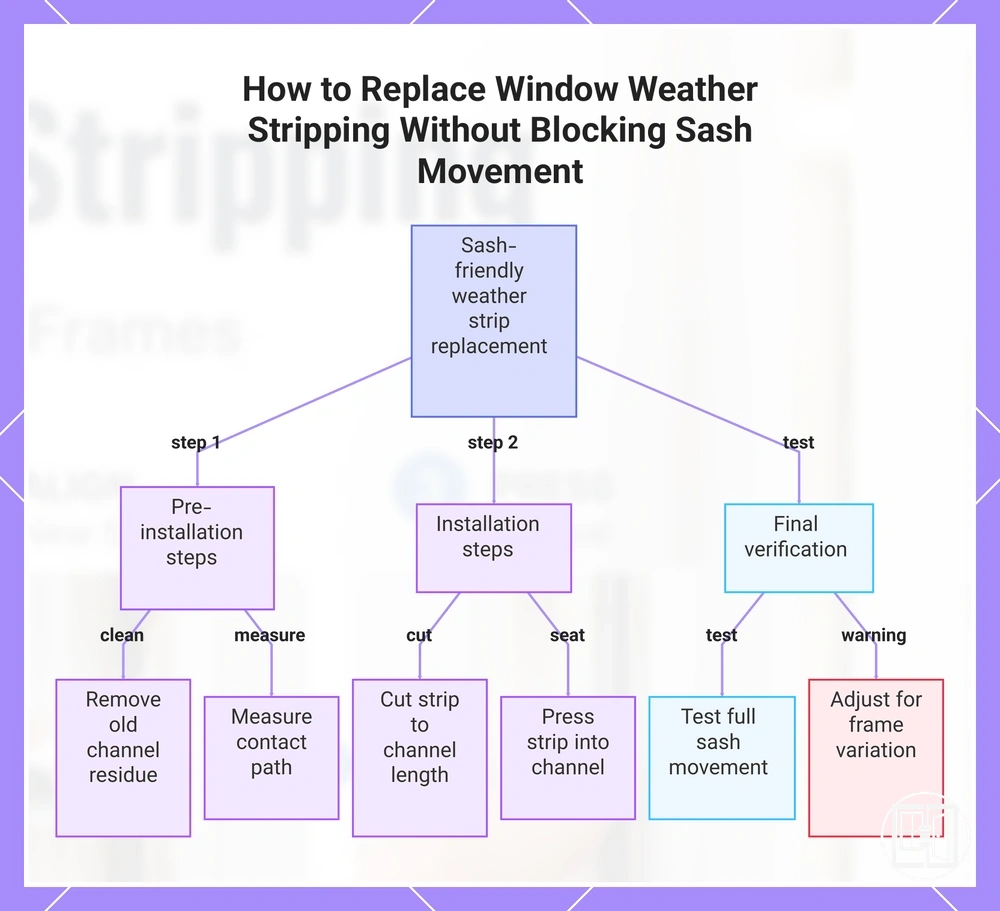
Replacing window weather stripping without blocking sash movement
Replacing window weather stripping without blocking sash movement depends on aligning the window weather stripping with the sash movement path, channel clearance, and compression space so the window seal improves contact without creating drag during opening or closing. The balance between contact path and movement tolerance ensures the replacement strip does not interfere with normal sash travel while still maintaining effective sealing along the frame.
- Channel cleaning → remove old residue from the window weather stripping channel → verify the channel is clear and the sash can move without obstruction.
- Measurement of contact path → measure the full contact path for the replacement strip → verify alignment with sash movement without overlap into moving areas.
- Cutting the strip → cut the window weather stripping to match channel length → verify clean ends that support smooth insertion without bunching.
- Seating in channel → press the strip into the channel with controlled seating → verify secure placement without restricting sash movement or increasing friction.
- Opening and closing test → move the sash through full opening and closing cycles → verify no drag, no binding, and consistent window seal contact.
In sliding, hinged, or older window frames, movement tolerance may differ, so compression space and channel clearance may need more careful adjustment to avoid restricting sash movement while still maintaining stable window seal contact during operation.
This chart outlines the key steps and final checks to ensure replacement weather stripping does not interfere with sash movement while maintaining effective sealing.
Window jamb, sash, and channel fit checks
Window jamb, sash, and channel fit checks determine whether a window weather stripping replacement will perform correctly by verifying how the window jamb, sash, and channel interact after seating. Fit checks depend on channel depth, sash clearance, compression pressure, strip thickness, corner continuity, and movement resistance, since these conditions decide whether the seal maintains contact without disrupting sash movement.
The following fit checks verify correct balance between sealing contact and movement behavior inside the window channel system.
- Channel depth → confirm channel depth matches strip thickness → ensures the replacement seal sits fully without lifting or weak contact.
- Sash clearance → verify sash clearance along the sash path → ensures smooth opening and closing without contact drag.
- Compression pressure → check compression pressure during closing → ensures seal contact is firm without restricting movement.
- Strip thickness → assess strip thickness against channel fit → ensures balance between sealing contact and sash movement tolerance.
- Corner continuity → inspect corner continuity of the window seal → ensures no gaps or breaks in the sealing line at junctions.
- Movement resistance → test movement resistance during opening and closing → ensures sash movement remains smooth without binding.
A seal that is too thin may fail to maintain contact inside the channel, leading to reduced sealing performance along the window jamb. A seal that is too thick can increase movement resistance and create drag on the sash, reducing smooth opening and closing behavior within the channel system.
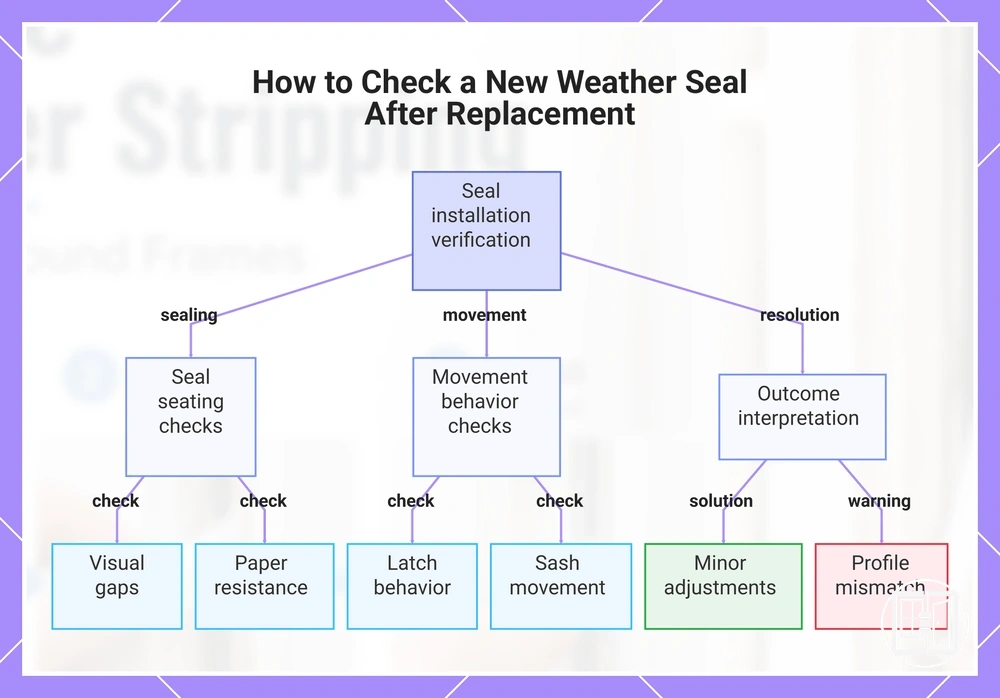
Checking the new seal after replacement
The new seal after replacement must be checked to confirm whether seal contact and normal operation are working together across the frame, since performance depends on how the weather seal behaves during real opening and closing conditions. This includes verifying that the new seal is seated, sealed, and operating correctly under movement before the installation is considered complete.
The following checks verify whether the new seal is properly seated, sealed, and functioning under real use conditions across visual contact, resistance, and movement behaviour.
- Visual gaps → no visible gaps indicate correct seal contact → visible openings suggest uneven seating or misalignment of the replacement strip.
- Paper resistance → light resistance when pulling paper indicates correct contact pressure → no resistance suggests weak sealing or poor seating.
- Light checks → no light passing through confirms proper sealing → visible light suggests gaps along the seal line.
- Air movement → minimal airflow indicates stable sealing → noticeable airflow suggests incomplete contact or compression imbalance.
- Latch behavior → smooth latch engagement indicates correct alignment → resistance suggests interference from the new seal.
- Sash movement → smooth opening and closing indicates correct clearance → drag suggests excess pressure from the seal.
- Corner continuity → continuous sealing at corners indicates correct fit → breaks suggest poor alignment or cutting mismatch.
If minor issues appear, slight adjustment of the seal position or seating pressure may resolve them. If repeated gaps, airflow, or movement resistance persist, it may indicate a profile mismatch between the seal shape and the frame or channel conditions, rather than a simple seating issue.
Final interpretation should focus on whether seal contact, latch behavior, sash movement, and corner continuity all work together without conflict. When these conditions are stable, the new seal is considered properly installed after replacement.
This chart shows the main verification checks and outcome interpretation for a newly replaced weather seal.
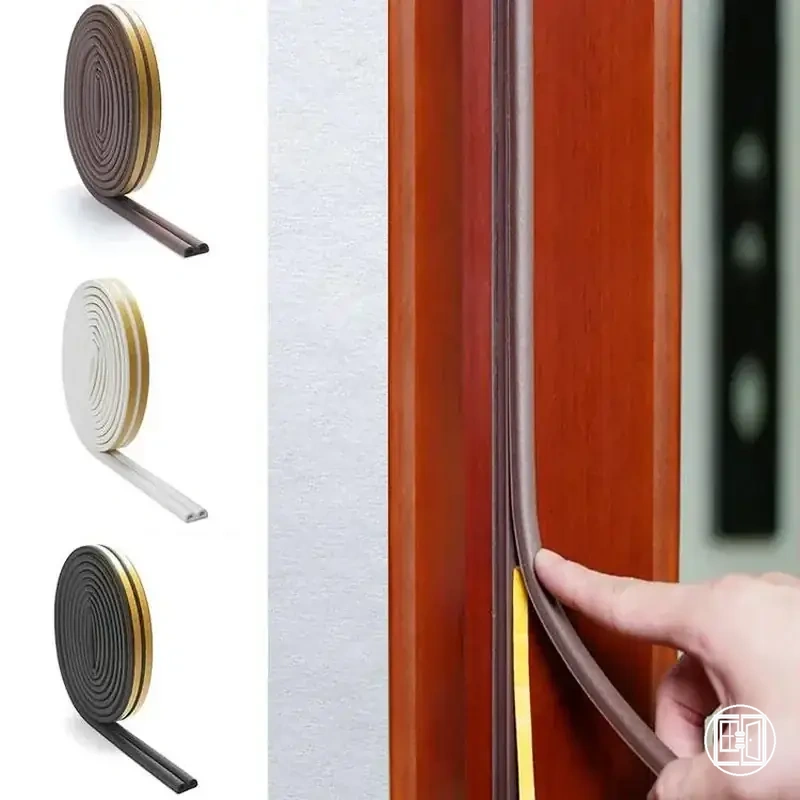
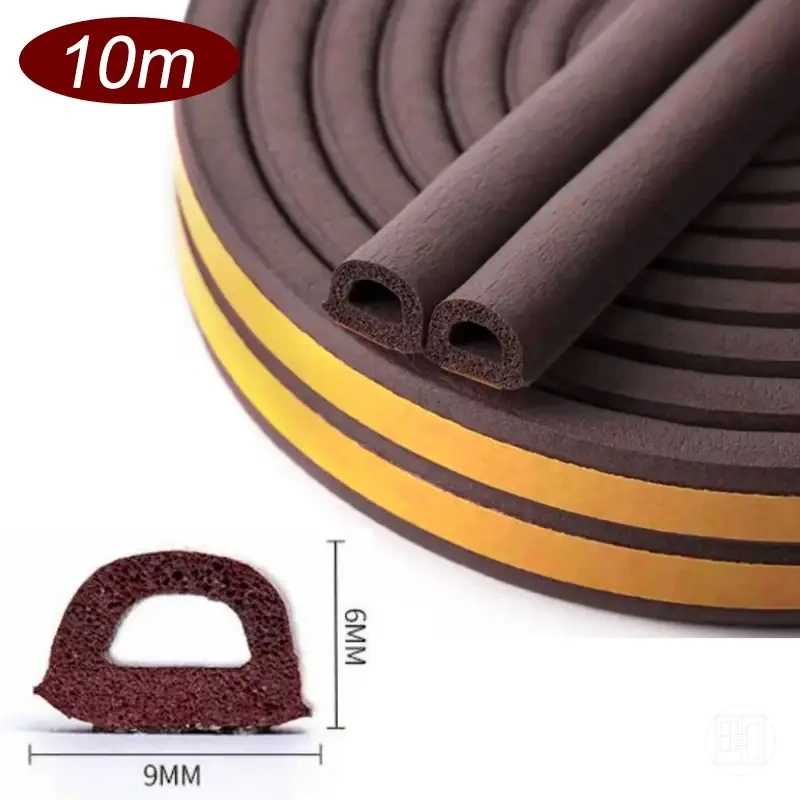
Here are product examples that may make comparison easier. Before buying, always review the compatibility criteria, essential features, and product details.
Fixing gaps after the replacement strip is installed
Fixing gaps after the replacement strip is installed requires identifying the gap location and its likely cause first, rather than immediately adding more material, because correction action depends on whether the issue comes from uneven compression, loose adhesive, profile mismatch, or hard closing conditions. Each gap location must be diagnosed to determine whether the issue is local adjustment or a limitation of the replacement strip fit.
The troubleshooting flow below explains how gap location connects to likely cause, correction action, and expected limitation so fixing gaps can be done in a controlled way instead of trial-based adjustment.
| Gap location | Likely cause | Check | Correction |
|---|---|---|---|
| Corner gaps | Poor seating or short corner cut in replacement strip | Check corner continuity and seal contact alignment | Re-seat corner pressure and realign strip edge before further adjustment |
| Uneven compression | Frame pressure variation or alignment shift | Check uneven compression along seal contact line | Adjust strip position to balance compression across frame |
| Loose adhesive | Surface condition or weak bonding contact | Check adhesion stability and lifting points | Clean surface and reapply pressure for stable reseating |
| Profile mismatch | Replacement strip shape not matching channel or frame depth | Check seal contact consistency across full run | Adjust seating or recognize profile limitation before further correction |
| Hard closing | Oversized strip or excessive compression resistance | Check latch resistance and closing force | Reduce compression load through alignment adjustment or trimming |
When persistent gaps or draft conditions remain after basic correction steps, air leak diagnosis can help clarify whether the issue is localized sealing or broader airflow behavior beyond simple adjustment. This check is used only after confirming seating, alignment, and compression conditions.
Final correction should follow the dominant diagnostic signal: corner gaps indicate seating issues, uneven compression indicates alignment or pressure variation, loose adhesive indicates surface bonding limitation, profile mismatch indicates fit limitation, and hard closing indicates excessive resistance from the replacement strip. When multiple signals appear together, the most restrictive cause should be addressed first before further adjustment.
Here are product examples that may make comparison easier. Before buying, always review the compatibility criteria, essential features, and product details.
Light gaps caused by uneven pressure or poor strip profile
Light gaps usually indicate interrupted compression along the frame contact line, where uneven pressure or a poor strip profile prevents consistent sealing between the replacement strip and the frame surface. These light gaps appear when the gap position does not maintain stable contact, often influenced by strip thickness mismatch, corner cut quality, frame flatness variation, or inconsistent latch pressure, resulting in a visible light line along the sealing path. This condition should be interpreted as a local breakdown in frame contact and compression behavior rather than a full system failure in sealing performance. :contentReference[oaicite:0]{index=0}
Diagnostic checks should isolate whether the issue comes from pressure imbalance or profile mismatch by evaluating key contact variables:
- Gap position → check where the light gaps appear → identifies whether compression loss is at corners, edges, or mid-frame sections
- Strip thickness → compare against frame channel depth → incorrect thickness can prevent full contact or create partial sealing
- Corner cut → inspect corner continuity → short or uneven cuts may interrupt sealing continuity and create visible lines
- Frame flatness → assess surface alignment → uneven or warped frames reduce consistent frame contact under pressure
- Latch pressure → test closing force → weak or uneven latch pressure can reduce compression at contact zones
- Seal rebound → observe return behavior → excessive rebound may prevent stable seated sealing over time
Correction depends on whether uneven pressure or poor strip profile is dominant. Uneven pressure can often be improved through reseating or local adjustment of the strip to restore balanced frame contact, while persistent profile mismatch usually indicates a better-matched profile is required to align with frame geometry. The decision should follow the dominant signals from gap position, compression stability, and seal rebound behavior.
Hard closing caused by an oversized or over-compressed seal
Hard closing often comes from the assumption that a tighter seal is always a better seal, but an oversized seal or over-compressed seal created by excessive thickness can reduce usability instead of improving it. A tighter seal is not always a better seal, and when compression height exceeds frame tolerance, the strip profile can resist movement, increasing latch resistance and causing sash drag during closure. In some cases, seal rebound pushes back against the frame, making closing less controlled and reducing overall usability rather than improving performance. :contentReference[oaicite:0]{index=0}
A tighter seal is not always a better seal, and the following checks help diagnose hard closing by evaluating latch resistance, sash drag, compression height, strip profile, rebound behavior, and related mechanical pressure conditions:
- Latch resistance → if closing force feels high → reduce compression height through reseating or adjust alignment instead of forcing closure
- Sash drag → if movement slows before full closure → check excessive thickness and consider a thinner replacement strip
- Compression height → if the seal appears over-squashed → reassess fit between strip profile and frame tolerance
- Strip profile → if edges distort during closing → realign or replace with a better-matched profile rather than increasing pressure
- Hinge or hardware pressure → if uneven closing force appears → check alignment or hardware tension affecting compression distribution
- Seal rebound → if the seal pushes back after contact → reduce over-compression through reseating or trimming
Correction depends on whether the issue is pressure-related or profile-related. Reseating can help when compression is uneven, trimming may reduce localized resistance, and a thinner replacement strip is often more appropriate when excessive thickness is the primary cause of hard closing rather than adding more sealing material or forcing closure.